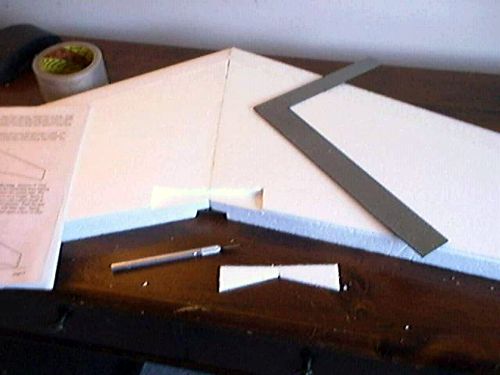
| Building a Zagi 400-X This being my first experience with foam building, and my first flyable plane project, I am a bit apprehensive about the whole thing. But I do love plastic modelling so I am confident I can make this thing fly. Yesterday I ran around to a bunch of stores to get the necessary adhesives and sanding stuff and assorted glues and tapes and other stuff. Much to my surprise, the R/C shop in Danbury (a Zagi web site listed Zagi dealer) had nothing I was looking for. They did however know an awful lot about Zagis and they had a completed and battle worn one there. I was amazed at how dirty and scarred it was. The owner said it had well over 50 flights and not so much as a prop broken! I was encouraged. Today I sat down and began the building. So far so good. I tried to follow the instructions provided by Trick as closely as possible. I also made sure to re-read the E-Zone Mag article for some pointers. I began by using a plastic, tapered edge ruler to separate the wing cores from their beds. It was very easy. This thing is pretty damned big! 48" across. I then taped the bottom bits together to form a bed and the top parts together as another bed. Placing the wing cores in the bottom bed I used 150 dry wall sanding mesh to remove the residue left from the factory cutting process. The sanding mesh is OK for the EPP leading edge of the wing only. It is too much for the softer foam of the rest of the wing and left nasty scratches. I used a 320 sanding film on the rest of the wing and that worked just fine. I then flipped it over and put it in the top bed and worked on the bottom of the plane. The EPP foam required significant sanding on the leading edge and also at the root edge for the center joint. Without sanding down both joining edge EPP parts it left a big gap when I tried to put the wings together. Next I taped a piece of cling wrap onto the bottom bed's center section so it would not stick to the wing after gluing. That done I pulled out the 3M Super #77 spray can and started shaking. I took it outside on my porch to spray and I am glad I did. That stuff is nasty! My hand is still sticky from the mist. Anyway, I sprayed a healthy amount on the joining edges of both wings and let them sit for 10 or 15 minutes. At first I thought it was too much, but it was not enough. Carefully I smushed the edges together, slid them to the optimal alignment and placed them onto the bottom bed to rest. I did work them a little as they were bonding to ensure they were sitting straight. After about an hour I began the cutting. Below is pictured the small piece you have to cut out for adequate prop clearance. I used an Xacto with a new blade and a metal, right angle ruler. It cuts easily enough, but I had to make sure I was cutting and not just dragging the blade through because the foam is very soft and is easily damaged.
The next step is to cut or rout out a channel through the center of the plane. Not having a router or dremel tool I used my knife. I cut two long deep cuts 8" from the tip from one edge to the other. EPP foam is not cut at all. To remove the foam I used a spoon shaped putty modeling knife which i just happened to have around. it worked perfectly. Again, I though I had cut deep enough, but I needed to dig out more to completely bury the carbon rod.
Here is the completed channel, the carbon rod and the putty knife/spoon thingy. (This is after vacuuming up all the tiny little foam bits that get everywhere.)
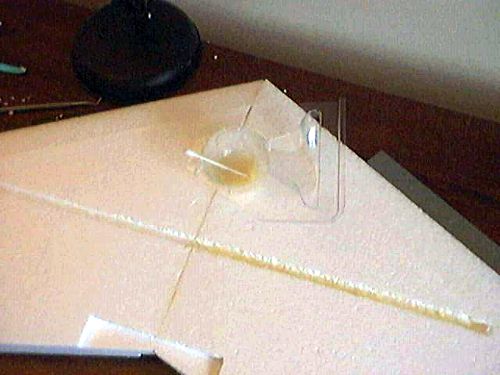
A dry placement of the rod to ensure it is deep enough.
As per the instructions I sprayed the carbon rod with #77 and set it aside. Then a goodly amount of #77 into a container and used a cotton swab to coat the inside of the channel. That goodly amount was enough for half so sprayed another goodly amount and coated the remaining parts.
I let it sit for 15 minutes then stuck the rod in. It will not shift once you stick it in, which is unfortunate cause mine ended up about 1/8" off center. I really hope it does not end up screwing me because I have to add weight elsewhere to obtain optimal balancing. This is supposed to set over night. |


HOME || IMAGES || MUSIC || WEB STUFF